Gameplay Scripting Devlog Weeks 9-12
- brandonmcrae
- Jan 10, 2022
- 15 min read
Updated: Jan 12, 2022
Week 9
Wall Buys
As mentioned in the weapon swapping section, there are unlock bools to stop the player from swapping to the other weapons until they are unlocked. Wall buy blueprints were made to fill this role and give the player something to progress too as they played.

Both wall buys are done using a custom event that is called from the "Wallbuy Interaction" macro mentioned in the player interaction section above. Both blueprints use the same code layout with the only difference between the two being the bool they turn on and the cost. The usual interaction text stuff is there with overlap events for the trigger. Both blueprints use their own price variables sense they are meant to cost different amounts based how late they can be obtained.
For the unlock events they are scripted exactly the same so for this instance I'm only using one screenshot. When the event is called a branch is used to check to make sure the player has enough points to purchase the weapon. If they do then the unlock bool for that weapon which in this case is the rifle is set to true which means if the player were to scroll to swap to that weapon they can. A purchase sound is then played as a set location which is gotten from the arrow components relative location. Next the player's points are decreased by setting it to the results of the points - the cost. The weapon selection int from the switch weapon function is then changed to the corresponding weapon which is 2 for the rifle and the switch weapon event is called from the first person character cast. This forces the weapon to swap to show the player they have unlocked the weapon. Finally the wall buy actor is destroyed sense there is no need for it anymore.
Windows
To stop zombies from just walking into the map and out numbering the player, windows are in place to block the zombies whilst providing the player with an extra source of income for their points. Each window has 6 boards which the zombies can destroy to enter the map and the player can repair to stop them.

To start there is an interaction text process the same as what is used in other blueprints however there is a check in this one that stops the text from showing if all boards are present. Apart from that the usual player cast, change key text event and hide text event is called.
Functions


The two images above shows the damage window function that is called when the zombies hit the windows. It has been broken into two images sense it could not fit in one and the same will be done for the repair code. To start when this function is called a check is carried out to see if the board total is more than 0. If it is then the board total is decreased by one with a set node and the board total variable is fed into a print string to print the number of boards left for debugging. Next an Int Switch is called which will execute one of 6 pins depending on the board total. Using pin 5 as the example for this next execution the visibility of board 6 is set to false, making the board invisible. The board reference itself comes from a simple macro that stores all board variables and fed them to out puts, making the code look tidier. Finally the collision of the board is set to no collision so that the zombies can walk through it. A side note is that there is a barrier to block the player so they can't pass through the window and get out of the map which will ignore the zombies. The process just mentioned is carried out for each board as the switch is executed.


This next function is made to reverse the effects of the first function every time its called with a few additional things added on and is called with the interaction event mentioned further above. To quickly run through it, a check is first done to make sure there are less than 6 boards. The board total is then increased by one with a clamp node being used to insure that it never goes above 6(the total number of boards). The board total is then fed to a print string for debugging and then into an int switch. Just like before the board total determines which pin is fired. The corresponding board is then made visible and its collision is turned back on. This next bit is exclusive to the repair function. A purchase sound is played then the player's points and total points are increased by 10 using a cast to the first person character. A check is then done to see if the total boards are exactly 6 and if they are a pure cast to the player is made and the "Hide text" event is called to hide the repair text, indicating to the player the window is fully repair.
Easter Egg Song
To give the player something to do besides killing zombies, there are some meteorite stands placed around the map that the player can interact with. Once they have interacted will all of them an Easter egg song will play to give them something to listen too while they play. It only plays once and once the stands are interacted with they cannot be interacted with again.

To start with, as soon as play begins an ambient sound is played at a location set using the world location of a component called sound location.
To interact with the meteorite stand the player calls on a custom event called interact using the interaction code mentioned above. To start the event checks if the number of interactions left is equal to or less than 0. If its not the it decrements the interactions left and plays an interaction sound at the "Sound Location's" world location. Next the collision for both visibility and camera line traces are turned off to ensure no further interaction can be made no matter what. The number of interactions left is the printed using a print string for debug in case it doesn't go down for whatever reason then a new branch checks again if the interactions left are equal to or less than 0. If they are the after a 2 second delay a function is executed which begins playing the easter egg song.

For extra clarity the above mentioned function is a simple play sound 2D. There was no major need to use a function but it looks tidier that way.
Week 10
Main Menu
To give the game a more polished finish I made a main menu which will be the first thing the player will be brough to, allowing them to take a look at the controls and give them the ability to both see the saved score and to select the level they want to play. Without going into extreme details on the level, the main menu is in a separate scene and is comprised of a hilly forest, some props like a campfire etc and some randomly places walker zombies that utilize a different behaviour tree that makes them walk to random spots within the navigation zone.

The above screenshot shows the general layout of the main menu including the props, camera and background scenery.

This is a screenshot showing most of the elements of the main menu UI just to give an idea of the layout and how it is all in one widget.

When the widget is constructed, the different elements of the HUD are turned off aside from the main menu child and the fade image. Additionally the fade animation is played so that when the player enters the scene seamlessly whilst also not being able to see the zombie AI standing whist they wait for a location to move to(more details below).

To give the player some feedback that tells them the menu is working, there are some hover and click events in place for every button used in both the main menu and the pause menu. When the player hovers the mouse over a button that can be used, a clang will play. When a button is clicked like for example the play button one element of the widget will be turned on as the last one is turned off and an echoed version of the hover sound it played to indicate that the button was pressed. This is the same for the back buttons any time the are used like with the options.

When the Exit button is pressed the usual click sound is played and a delay is started for 0.9 seconds. Once this is up the game is the closed using a Quit Game node.
Level Selection UI

The level section UI was actually made with a separate widget that was then added to the main menu UI meaning it could be turned off and on again without having to mess with the viewport. All functionality is already built into the widget so that nothing extra has to be added to the main menu widget to make it work. To start the main menu host is casted to using the player spawn and is promoted to a variable to access the variables etc in the blueprint.

The usual process of enabling an disabling the visibility of different UI elements is used for the back button which hides the level selection UI and shows the main menu. The same sound executions are used for both button presses. The bottom event event covers which the player presses the level button. A delay starts and after 0.7 seconds and once that is up an Open Level by Name node is used with a Make literal Name node being used to feed the exact name of the level into the level pin. This means that when the player presses the level button, they will be taken to the corresponding level.

The level selection also has a mini score board under the level preview which shows the player what their last score was using the sae system in place. All stats are loaded in the same way which the only difference being what variable is accessed for the return value. The above image shows an example of one of the stats but like said the process doesn't change. A binding is created for the text and a Load Game from slot node is called to look for the save game file called save1. That is then fed into a cast node for the score and the corresponding save data is then taken and sent to the return value using an int to text transfer node. With this process applied to all saved data text, the values will match what is in the save file when the level is loaded.
Zombie Prop Behaviour Tree
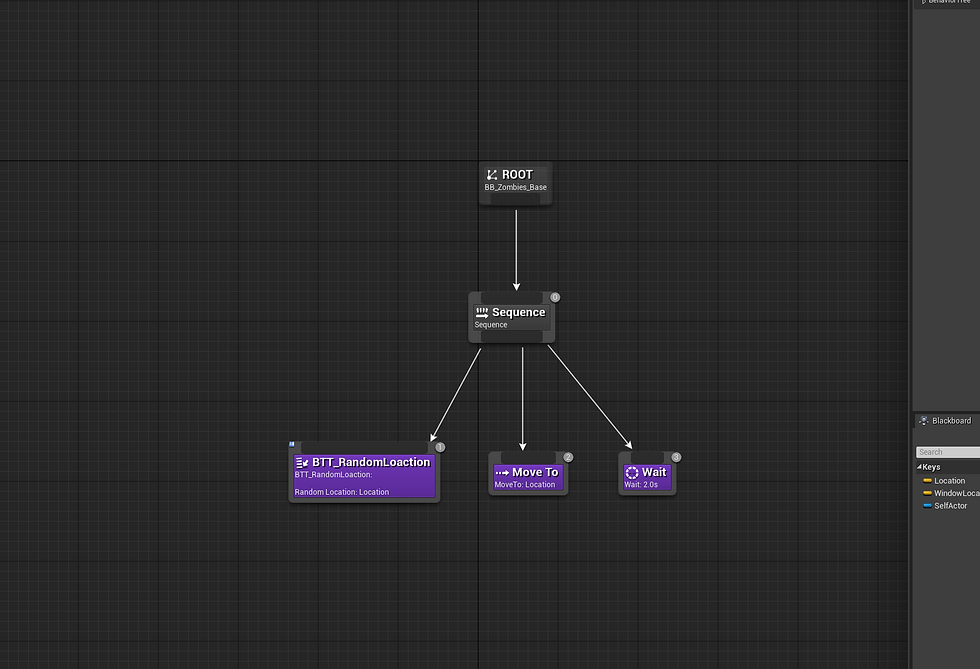
In the background of the level there are some basic zombies placed around that use a different behaviour tree to the walk and runners used in gameplay. They are purely for aesthetics and play no other role other than to just walk around. Using an AI detour controller made for these zombies used for the enemy zombies, the behaviour tree fist executes a custom task which gets a random point in the nav mesh and sets the location to it(more below). The AI then moves to that point in the nav mesh then waits 2 seconds before receiving a new point to move to. This makes the zombies walk around to random points at all times. It should be noted that the only thing done code wise in the controller is running the behaviour tree above.

To get the random point in the nav mesh the AI controller is first obtained, then actor location is obtained from the pawn being controlled. The result is then fed into the origin pin of a "Get random point in navigable radius". The radius of which this random point can be obtained is set to 5000 which gives the zombies a wide enough radius to travel. All of this is then used to set the location key in the behaviour blackboard with a "Set blackboard value as vector" node using the location key as the target key and the result of the random point as the new vector. The execute is then finished so that the move to can be carried out.
Main Menu Host (Manager)
The role for this blueprint is just to be the host that is used to print the main menu UI to the viewport and set the input mode.

When the level begins, the main menu widget is created and set as a variable then added to the viewport. The mouse cursor is then forcibly shown using a set mouse cursor node. Next the input mode is then set using a Game and UI input mode node with the player controller being set using a get player controller node and the main menu widget being fed into the focus pin. Finally the main menu soundtrack is played using a play sound 2D node.
Pause Menu and Scoreboard
when the player wants to stop the level for a bit to think, reset, look at the controls or stop playing they need a menu to do it. That's were the pause menu comes in, giving the player the ability to pause the game, restart the level or leave back to the menu.

Above is a screen shot of the menu itself. The player has the option to resume the game, view the controls, restart the level from the start and too quit the game and go back to the main menu.
Functions
It should be noted that all functions for the pause menu and the score board are built into the player so that they are easier to access.

This first function is designed to pause the game and display the pause menu. To start an Is Valid check is used to see if the pause menu widget already exists using a reference variable. If it doesn't already exist then a widget creation node is used to create the pause menu widget which is then promoted to the pause menu variable then added to the viewport. The is paused bool is set to true then the mouse cursor visibility is set to true. If the pause menu does exist then there is no need to create another one and instead it is just added to the viewport and the Is Paused bool is set to true, feed then into the cursor visibility node. Once the cursor is visible the input mode is set to game and UI using a set input node which the pause menu being used as the focused widget and the player character is used as the target controller. Finally an in engine function called "Set Game Paused" is used to pause the game timescale which stops events that aren't allowed to play while paused. This for the most part will freeze everything though sound effects will persist.

Another function is used to unpause the game one it can been pause. This can be called even when the game is paused so the player can either repress the pause button or use the UI which adds some extra options if the player is just pause for something quick and doesn't want to move their move to unpause the game. First the pause bool and mouse cursor visibility is set to false meaning the cursor will be hidden. Next an Is valid check is used to see if the options widget is up or not. If it is then it is removed from the parent along with the pause menu which will remove them from the viewport. Using the player controller the input mode is then set to game only and the same function that pauses the game then is set to false which unpauses the timescale, allowing everything to being moving again.

This is a screenshot of the scoreboard the player can use to see their overall score stats during play. These are the same stats that are saved and loaded in the main menu so the text binding are exactly the same, using casts to the first person character to obtain the corresponding variable.

When the player presses the tab button, a widget creation node creates a scoreboard widget which is the promoted to a variable and added to the viewport. As long as the button is held down the scoreboard will remain visible however if they release the button it is removed from the parent using the scoreboard variable.
When the player presses the pause button which in this case is Escape, a branch is used to check if the pause bool mentioned above is true or not. If it is true and the game is paused then the Unpause function is called, unpausing the game. If however it is not true then the pause function is called instead.
Week 11
Saving and Loading
In order to give the player a reason to replay the game, a save and load system needed to be made to store data like the player's kills and score etc. That way they'd have something to beat next time they played.

All functions are stored in the Main Gamemode sense it is used during the level. Values are saved and sent using the gamemode to make it simple enough to not end up wasting time on. A "Create Save Game Object" node is used to take the score save blueprint that use the results in an input pin in a function called Save Game to slot. The data is saved to a slot that is named save1 which means the values could now be accessed and loaded due to the slot being saved to a separate file from the game files.

When the scene begins, a node called Does Save Game Exist is used to check to see if if the file called save1 exists. If it does the the Load game from slot is called to load the data, casting to the score save as a reference of itself and grabbing the variables, If the file doesn't exist then the above mentioned create new spawn code is carried out to make a new save file.

The custom save game event starts by using a Load Game From slot node, feeding it out to a cast to the score save blueprint, Using a cast to the first person character, the values are set to equal their equivalent variable in the player themselves. This means that when the event is called, the values will always be accurate. For example the Highest wave is set equal to the Plyer character's highest wave. Once this is done the data is saved out to the save slot which means the values for the UI will be the same even if the player closes the game during play.
Death Cutscene
As seen in the hit event for both zombie classes, when the player is hit there is a check at the end of the hit event that checks if the player's health is at 0. When it is the death/ "Player Death" event is called which will play a scripted "cutscene" so to speak.


First the "Is Dead" bool is set two true. The input for the character is then disabled using the player character as the target and the player controller as the controller to disable. This stops the player from being able to move around or look around. Once this is done the ability to generate overlap events for the player is set to false using the capsule component which stops any further attacks from being carried out as this would layer the event from multiple calls. The player HUD is then removed from the parent which hides it from the viewport and the scoreboard is shown using a macro(more details below). After a 5 second delay, the camera is changed to the death camera using a macro(more details below), giving the player an overview of the courtyard, making things more quite as the AI in later rounds end up stacking up which makes their sound cues overlap which can get pretty loud. It also makes the death conditions more cinematic, adding more overall polish to the project. Next the score is saved to the game file using the save event from the game mode with a cast after a 15 second delay. A fade out is then played by getting the general fade widget, adding it to the viewport and playing the fade animation in reverse, making the opacity go from 0 to 100 instead of 100 to 0. A last 3 second delay is carried out and then the Main Menu level is opened, taking the player back to the main menu.

As mentioned above there is a macro used to display the score board. This image shows the macro and its process. First it checks to see if the scoreboard is valid and if it isn't then a new score board widget is created and set to the score board variable. It is then added to the viewport and that is it. If however the player has already opened the score board during play then it will exist meaning it is just added to the viewport straight away.

For this macro, a simple node called "Set view target with blend" is used to change the current view target which is the player's camera to a new vie target which is a camera overlooking the courtyard called Death Camera. To ensure the player's view is being changed the player controller is obtained and fed into the target pin.
Week 12
Packaging preparations
Before packaging the final game there was one last major thing that need to be done, setting the player up with spawn parameters that determine their spawn weapon and ammo amount along with adding the needed UI to the viewport.

This has a number of different things happening so I'll quickly break it down into a number list. When the level starts and the player is spawn the following sequence of events occur:
A widget creation node is used to create the player HUD which is then promoted to a variable and added to the viewport. A get actor of class node is then used to get the death camera and promote it to its own variable to be used in the death event.
The "Is Damaged" bool is set to false to ensure there is no overwrites that could bug it out.
The mouse cursor visibility is then set to false and the input mode is set to game only, hiding and locking the cursor into the middle of the screen.
Finally the pistol child class is then spawned using the player mesh's world transform. It is the promoted to the gun variable and attached to the character using the mesh as the parent and the GripPoint socket as the attach point. Finally the total ammo is set to 42 and the mag ammo is set to the pistol's mag ammo value which is 7. The reason for not giving the player the maximum amount of reserve ammo is to force them to use the ammo create and be introduced to how it works.
Now with all of this executed the player is ready to play the game. Some other things are set up in the project settings to reduce the file size of the project to make it easier to download. Additionally a movie is added which plays an introduction movie/ splash screen when the player opens the game which can be skipped at any time with any button input. With that done the game is ready to be downloaded from itch.io and be played.

Comments