Gameplay Scripting Devlog Weeks 1-8
- brandonmcrae
- Dec 29, 2021
- 41 min read
Updated: Jul 5, 2022
Week 1
Starting the project off we were provided with a pre-made project that came with a number of basic meshes along with a pre-made scene equip with lighting volumes and a basic level. The first thing I did was begin testing different light effects using blueprints. First thing was to make the mesh the player could see along with a spot light to add light based functionality. Below is the first screenshot to show the final mesh made this week:

This was made with a collection of standard static meshes and a custom material using emission to create that glow effect. Next was to add functionality to the spot light using the visual scripting "Event Graph". We were taught how to set a delay using delay nodes as well as using timeline nodes and "Set intensity" nodes. Below is a screenshot of the final blueprint events:

From the start the script begins executing when the level starts as seen by the "Event BeginPlay" node and accesses a timeline. The timeline uses two custom variables to set values over a duration like say between 0 and 1 over 5 seconds. These variables are then fed to a "Set Intensity" and "Set Light Color" node which then changes both the intensity of the light to the values determined by the timeline and the colors as well. Below is a screenshot of the timeline and how the variables are set up:

The "Flicker" variable is a float that is set to fluctuate between 0 and 1 over the duration of 2 seconds which can be seen by the "keys" in the graph. These keys represent those float numbers between 0 and 1 which makes the light intensity go up and down, creating a flicker effect. Below that is a color variable which works the same way. All the colors from left to right will be cycled through as the timeline plays through the 2 second duration which is then sent out to the set color node, making the light's color change in a rainbow effect. The variables or more so the timeline is also set to loop so the animations so to speak will continue to play until told otherwise.
Other things I did this week was make a simple mesh for the elevator that I intend to work on later along with making some visual blueprints like the barrel with fire which I will go into in another post and the barriers you can see in the video. These are just simple mashups of provided assets like cubes etc that I used to create the barred barricades.
Week 2
Jump System
Having begun to dabble with some different areas of the blueprints system, I began to develop the player's movement further by adding a system to allow them to jump using the set jump key which by default was set to spacebar. In the below screenshot I set up a few custom inputs to allow the player the ability to perform certain actions whilst not being binded to one specific key, I plan to later implement a way to change the keys used for these inputs:

This is the menu I will be using in all projects to set key bindings to input actions. I the future I will be setting up a way for the player to change the set keys using a blueprint so that the players can adjust their binding layout to something that works better for them.
With that Jump input set up I then moved on to create the blueprint itself. To allow the player to jump I needed to add a new event into the player blueprint that used the new input action to execute a jumping command that is pre-built into unreal's character controller. Below is the screenshot of the blueprint event I used to make this happen:

Without getting into the nitty gritty of how these functions are set up, the Jump and GroundCheck functions used belong to the character controller/ Nav Movement component being used on the player. The event itself is a simple process that checks if the player is on the ground or not when the input action is pressed and if they are then it executes the jump function. This function could be changed using variables however I decided that the basic values for the function worked fine for what I needed.
Points System
For the Points system I intended to make a value that indicated the player's earned points that the game could then draw to when determining if the player could buy doors, weapons, upgrades etc. This was an easier enough process and actually gave me a reason to set up the player's HUD UI as well for their ammo, current round and temporary crosshair. To start I made a Widget Blueprint to set up the basic UI. The screenshot below shows the set up of the widget:

The only components being used in the widget are text components that are anchored to their respective sides of the widget. The real magic happens in the code of the widget that is used to overwrite the text to what it should be. The next screenshot shows the code used to set the points text to represent the players actual points:
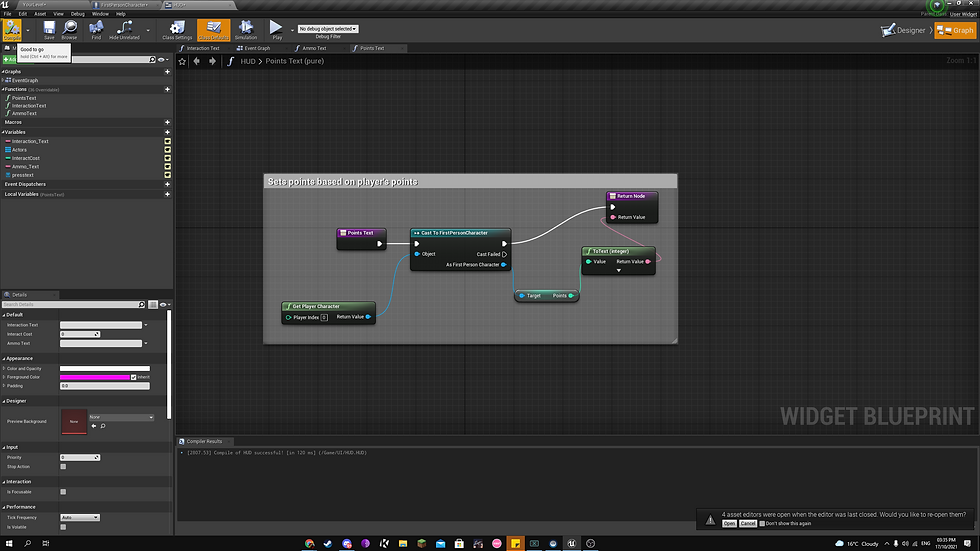
In short the text is updated to project the "Points" variable that is set on the player by casting to it and returning the value from an integer to text, feeding it to the "return value" node. This makes the text change to whatever the points are so if it was 100 and 10 were added, the points would change to 110. The next screenshot shows how I then projected the widget to be visible when the player begins playing the game:

This code basically creates a HUD widget using the "HUD" class mentioned above, setting itself as HUD and using the "Add to Viewport" to draw the HUD on the player's screen. Finally as a debugging tool to allow me to test the points system as it is further added too I added some basic functions to the player to allow me to increase and decrease the points at will for testing door buys both with and without enough points, the code for which is provided in the screenshots bellow:

The basic outline is that when either Z or X is pressed the points will be either increased or decreased by a set amount which in this case is by 250. The new points are then printed as a string just in case something gets messed up in the text element so that I can continue testing without needing to spend to much time fixing issues. The way I see it as long at the points variable is still working, UI elements can be fixed last sense they are only visual indicators.
Week 3
Barrier Door Buy
ow that the player has points to earn and use around the map I began working on way to stop the player from moving around the map until their are ready to progress. For this I choose to use doors and barricades that could be bought by the player with enough points. To start I created a barricade to block the exit to the player's spawn using some cubes and the provided barrel mesh as seen in the screenshot bellow along with a screenshot of the code used on it.

Main functionality

Side Functions

To start with, the main functionality code is set execute as a custom event called destroy door. In short the code casts to the first person character to get the player's current points. It then checks to see if those points are greater than or equal to the cost variable. If it is the the code begins a sequence that goes in order of:
Reduce the player's points by the cost
Play a sound effect for the purchase
Play a sound effect for the door disappearing
Get all actors of class in an array and destroy them
The side functions simply makes the UI text appear and disappear when the player walks inside of the trigger box. The first line also amends the UI text to display the cost amount for the barrier itself.
Power Door Buy


Similar to how the Barrier works, when the player has enough points and presses the interact button it will execute this code in a sequence:
First it decreases the player's points by the cost
Next it plays a plays a buzzer sound at the location of the door
It also then plays a purchasing sound effect on top of the buzzer
It then begins a timeline that moves both the doors away from each other using predetermined vectors
Finally it destroys the trigger for the interaction
Again like above the code to execute this custom event is placed in the player character and only activates when the player is in range for the lane trace to hit the door.
Power Switch
The power switch is designed to act as a blocker to the player that they have to turn on in order to do certain things. These mainly being things like purchasing Conduit Liquor(Perks), Upgrading weapon, Opening Powered doors and turning on the lights. To start with the blueprint has a bool called "Powered" which is what will be used to determine if something is powered or not and thus can be used. Additionally all main lights in the level will also be tied to an array and turned off when the level starts using the code below:

The code will go into the array and say that for each actor in the array if valid, will use the light component tied to the lights and set their intensity to 0, thus turning the lights off when the scene begins.
This next set of code determines when happens when the player interacts with the power switch.

As a custom event the code executes in the following sequence:
Using a Timeline the switch is rotated from a pivot created using a scene component over the span of 2 seconds
A sound effect if then played near the switch to signify that the power is on.
The light array is accessed and all lights in the array have their intensity set to 300 which turns them on and the "Powered" bool is set to true.
Finally the "PackaDoor" blueprint is casted too and the custom even "MoveDoor" is called, removing the door for the player to gain access to the blocked area.
With the bool set to true, any blueprints that require power will become usable by the player.
Week 4
Elevator
Starting this week off I've Quickly modelled an elevator shaft with entrances for two floors. With this I can add extra parts in unreal like the doors and adjust them with code. Below is a quick image of the final mesh in use:

Door Functionality

To move the pad a custom event is used so it could be called when needed. First a custom event called "Text Trigger Activation". The triggers that show the text telling the player they can interact with the elevator are turned on and off using this event based on where the pad is(more details below). Once this is fired a bool is then checked, determining if the pad is moving or not. This has to be false to stop the player from being able to move the pad again until it reaches the designated floor. Once passed the "Is Moving" bool is set to true and another branch is called to check what level the pad is on. If the pad is on the top level then it is true and if not then its false. Once called, a timeline is then fired off based on the previous value, if it is at the top level then it will play from the start and if not then it will play in reverse. The "Relative location" of the pad will be updated using a lerp that utilizes the top level vector and the bottom level vector, using the timeline as the alpha to blend the movement seamlessly between the two. Once the timeline is finished playing the "Is Moving" bool is then set to false and a custom even called "Open Door" which opens one door and closes the other(more details below).
Text Activation Event

Hide Text Macro

The first image shows the above mentioned "Text Trigger Activation" event that is used to turn the interaction text off when the pad is interacted with. A sequence is used to first turn the outside interaction text for both the top and bottom on or off based on where the plyer is calling the elevator so if they are at the top floor then the top trigger will be disabled and the bottom will be enabled. The order is set based on a branch that uses the "Is Top Level" bool. Once the first part of the sequence is done it then applies the "Hide Text Macro" again and disables the interaction trigger of the pad. This is primarily for when the player is in the elevator to show they can't interact with it anymore.
The second image is the "Hide Text Macro". When this macro is used it casts to the "First Person Character" and grabs the HUD. It then calls the "Hide Text" custom event which sets the "Interaction Text's Opacity" too 0, hiding it.

As mentioned above, the Pad movement event calls on another custom event called "Open Door". The event starts by first checking is the pad is moving and if its not then it checks if it is at the top level or bottom level. Based on where it is the following will be executed (Example being if the value is true):
A sequence will fire to two timelines, one for the top door and one for the bottom door, playing the top door timeline from the start and the bottom door timeline in reverse(if the pad is not at top then this process is reversed).
A lerp is then accessed using the timeline results as the alpha and moves the corresponding door from a predetermined value to a new predetermined value and vice-versa.
Finally the lerp location is sent to a "Set Relative Location" Node which moves the door from position A to position B using the timeline Alpha to make a smooth transition.
Once the Timeline is finished it will print a string to the log for debugging purposes and will re-enable the "Pad Interaction Trigger" for the player to use again.
Interaction Text Overlap Events

The following image shows the overlap events that show/set the interaction text when the player is in the trigger and hides the text when they leave it. Using the "CallToTopTrigger" as an example, when the "FirstPersonCharacter" overlaps with the trigger it is casted to and the "Change Key Text" event is called from the HUD (More details of this below). When the player leaves the trigger the text is hidden using the "Hide Text" event in the HUD using the same casting process.
Pad location Triggers

This last image shows the trigger functionality for setting the "IsTopLevel" bool. An overlap event for each trigger checks to see if the actor that passes through it is the "Pad Component" or not. If it is then the Bool is either set to true or false (If the pad hits the top trigger then it is true and vice-versa). A print string is also sent saying that the pad is either top r bottom based on the trigger for debugging purposes.
UI (Player HUD)

The above image shows the full player HUD with no code influencing it. Some elements are influenced by pre-construct code to turn them off when they aren't needed (mostly when the level starts).
Before going into the Event Graphs we should outline some of the background functions, macros and binding being used to give some extra context to things used in custom events.
Bindings

Starting off there is the binding for the progress bar at the centre-top of the canvas. This sets the fill of the progress bar based on the players health. To do this the health variable is grabbed from a cast and it is then divided by 100 to make it a percentage out of 100. This is cause the fill can only be a value between 1 and 0 so being a float that is divided by 100 allows the variable to return 1, 0 and anything in-between.

This next binding sets the round text to be equal to the String variable "Round No. Text". The variable is changed in an event shown further down which directly then feeds into the return valve of the binding which updates the text to the new round.

This next binding is in place to update the points text to match the points the player has. This is done by grabbing the "Points" variable from the player with a cast event and feeding it into the return valve using a "ToString" node, essentially converting the number value to a text value.

The last binding is in place to set the ammo counter for both the reserve ammo and the current gun's mag. This is done by grabbing both the "Mag Ammo" and the "Total Ammo" variables from the player character and feeding them into an append node. The append node creates a string which can be broken down into multiple parts, each having their own inputs for values such as strings or in this case integers or can be hard typed. In this instance the mag ammo (7) is first followed by a divider then the total ammo (48) making a string "7 / 42". Finally the ammo text is then set using the append using a "ToText" node and is then fed into the return node. Setting a variable gives me the option to access it as a whole instead of having to access the append node sense that isn't possible for anything outside the HUD.
Macros


The two macros serve the simple function of turning the visibility of the respective HUD elements off and one. The top is used to turn whatever element is fed into it on and the bottom is designed solely to turn all dash images off and turn the numbered round counter on. These are placed in macros mainly just to tidy up the outer code and for reuse sense the top one is called more than once and it save making the same code several times over.
Functions

The following function plays the role of utilizing the "EnableThis" macro to turn the corresponding dash on when called. The function is designed to be called multiple times, each time enabling the next dash until it is complete. To do this it first accesses the "SpawnManager" blueprint which at this point has yet to be set up. After getting the spawn manager it pulls the "Wave Number" variable and feeds it into an "Int Switch". The int switch essentially executes the pin that has a number that matches the int value which in this case is the wave so for example on wave 5, pin 5 will execute when this is called. Each pin fires into an "EnableThis" macro which also has a round dash fed into it. This means that as the waves progress, each dash will be turned on from 2-10. Once the wave is at 11 it is then fired into the "Enable Numbered Rounds" macro which takes in all prior dashes and disables them all and instead enabling the numbered round counter. With the binding in play this counter will be updated each round so it will be in line with the correct wave, that being wave 11 and on.
Event Graph Functionality

To start with, we have a "Pre-construct" node that starts with a sequence. First it casts to the spawn manager and promotes it to a variable so its easier to access. Once that's done it then takes all wave based elements and sets their visibility to off. That way one will be turned on which will be the first dash.

This next event takes place as soon as the HUD is constructed. First of all it sets the opacity of the interaction text to 0 which will hide it. Next it will play a pre-made fade in animation then wait for a 2 second delay then play another animation that will put the first dash from the middle of the screen to its original position. For extra note this is a scripting based Dev-blog so any animations will only be briefly talked about, mostly when they are relevant to the coding process.
Custom Events

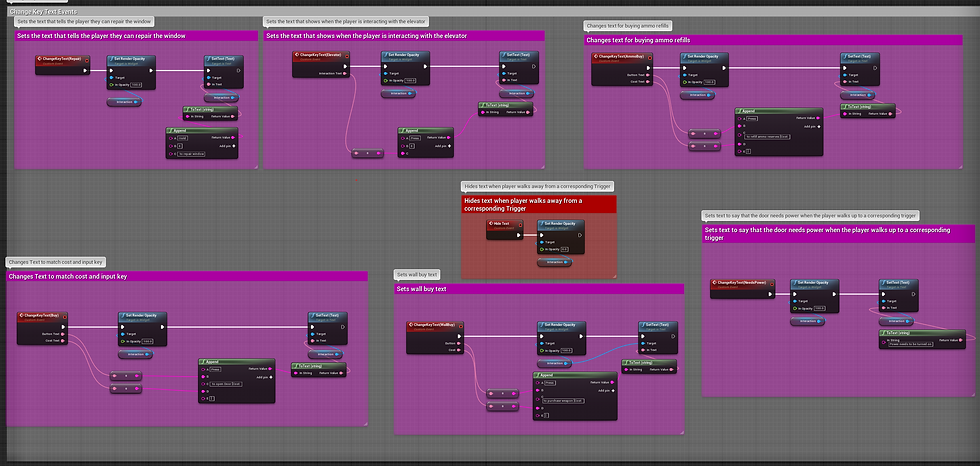
These two custom events are the events mentioned above, with the bottom one only being one of many. All "Change Key Text" events work with the same logic with the only difference being what is in the append node so for this screenshot I've used one. It starts by first changing the opacity of the interaction text to 100, making it fully visible to the player. It then uses an append to set the text to tell the player to press a key to do an action and if it involves points it also gives them a cost. The final string of the append is then fed into a "Set Text" node which changes the text on the HUD. This logic is applied in all key text events.
The top event "Hide Text" is a simple custom event that hides the interaction text when it is called by setting the opacity back to zero. These two work hand in hand to turn the text on and off along with changing what the text says, removing the need to have multiple strings of text. The blow image shows all of the key text events however they may be difficult to see because of the zoom range.

The last set of custom events manage both the round text and the dash updates. The first event when fired will play a slight fading animation for all active dashes and after a 9 second delay it will execute the "Update Round Counter" function mentioned above. The next event is used to set the previously mentioned "RoundNumberCounter" variable to the new wave. This is done by grabbing the wave number from a reference of the spawn manager then after a delay setting wave number as the variable's new value. This creates a delay between round swaps so that the numbered rounds don't change before the sound cue.
Week 5
Character Interaction
There have been a number of different custom events set up in multiple blueprints including but not limited to the above mentioned one like the elevator, power-switch etc. In order to actually get them to work they need to be triggered by the player character.

This first set of nodes acts as the activation conditions for the character's interaction. First when the player presses the E button it calls the junction that determines if the player is close enough to interact with something interactable. Once that's done a "Set timer by function name" is called so that the search will be looped every so many seconds for as long as the button is held. Finally when the button is released the timer is paused or turned off.

This next images shows the above mentioned function that creates a hitscan for the game to be able to tell the player if they can interact with something. A line is drawn from the forward vector of the player's camera and is drawn at a distance of 200 in all axis which sets the player's overall range at 200. A break hit result is used to grab a reference of what is being hit if anything which then feeds into 2 different macros which are responsible for actually finding the interactable and executing the interaction.
Macro 1 - General interaction


The first two images above show the different casts being made. The hit result is fed form the macro input into the casts which lets unreal check if what its hitting is what is being cast to. If it is then it executes the interaction event/function. If the cast fails however and the item being cast to is not the hit result then it moves on to the next cast until it finds what it did hit. If it is none of these then it is fed into the outputs and carries on to the next Marco.
Macro 2 - Wall-buy Interaction

Same logic applies here with the hit result being fed into the cast and if it matches the cast the the function is executed, if not then it moves on. More details on these functions are mentioned later on as these are only empty functions but the logic for this will never change. If the hit result comes back with no matches for any of the casts in the 2 Macros then it returns null and nothing happens.
Character Movement
The project files came with some basic movement code which allows the player to move horizontally in all axis and well as allows the player to use the mouse to look around. Some additional changes were made to allow the player more options for movement.

Taking the already existing movement code from the top I added some additional functionality to allow the character to sprint. First two custom events called "SprintOn" and "SprintOff" are used to access the player's built-in "Character Movement Component". To give the player move freedom to get away from faster enemies I opted to not use a stamina system. Finally the two events are called using an input even that uses the shift key. When the key is pressed the character will sprint and when it is released they will go back to walking speeds.
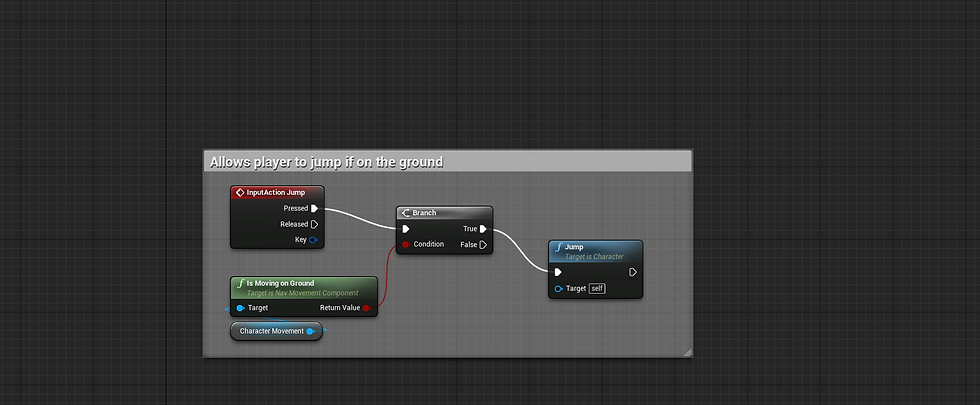
The last major area for character movement is the "Jump" event. When the player pressed the jump button which by default is spacebar the event will first use a built-in function of the "Character Movement component" called "IsMovingOnGround" which basically checks to see if the player is touching or moving on "The Ground". If the player is then another built-in function called "Jump" is called which propels the player up based on a unit set in the component. This is also effected by other forces like gravity which can also be adjusted in the component for fast falling etc. The ground check from before insures that that player cannot jump more than once once they lift off however this can be played with for things like double jumping etc.
Weapon Parent and Child Classes and Bullet
In order to give the player a weapon to fight with there was some pre-requisite that had to be covered such as making a bullet to fire and a parent class for the weapons to derive their behaviour from.

First is to make the bullet. Without going into to much detail the mesh is a simple sphere that is stretched out with a glowing material applied to make it more obvious sense it will be moving quite quick. The above screenshot shows the code being used to make the bullet travel. When the bullet is spawn the "Start time" variable is set to the game's real time second with a "get real time seconds" node then the first person character is promoted to a variable for later use if needed. To make the bullet move a tick event is used sense it is called continuously. An "AddActorWorldOffset" node is used to shift the bullets position, using the actor's forward vector multiplied over the results of the tick seconds multiplied by the move speed which as a result moves the bullet forward at a constant rate. A final check is used to see if the tick event's real time seconds are equal to or greater than the start time and lifetime added together. If it is then the bullet is destroyed. This sets a lifespan for the bullet otherwise it would persist and the tick events would eventually cause lag.
Overlap Event

The overlap event is in place to allow the bullet to do damage to specific actors. To do this it first takes the actor it is overlapping with and sets it to a variable to be accessed later in the code. It then check to see if the actor implements a specific blueprint interface which will be used for things that are damageable. If the actor it hits implements this interface, it receives a message from the interface called "Custom Damage Event" with the target being the hit actor variable and the damage amount being set to a damage variable. After the damage event, the health of the bullet is decreased. It then checks if the hit actor is either the zombie walker class or the zombie runner class. If it is either then it performs a cast to that class and called the "Zombie Dies" event(more details on week 6). Finally once all of that is done the bullet actor is destroyed.
Next was to set up a parent class for the weapons to derive from to make it easier to make multiple weapons and work with them when they are attached to the player character.

To make it simple the actor has two main elements. It has a blank skeletal mesh and and an arrow which will both carry over to the child classes made from this. At that point its as simple as adding a mesh to the component from the menu and moving the arrow to the muzzle.

To start with there are two custom events that are intended to be used in the player character. These are "FireGun" and "StopFireGun", these events are also going to carry over to the child classes and some extra functionality can be added there so the effect changes with different guns. Finally an event begin play is used to cast to the player character ad set it as a variable to use later.
There 2 functions and a macro that are used to allow the child classes to be able to fire. One function is the actual firing function, one is to draw a line trace that will be centred to the centre of the screen and a macro that checks if the line trace hits one of the two zombie classes.
First is the fire function. When the function is called it will do a number of things such as spawning emitters, spawning bullets and decreasing the ammo. The following screenshots are for the same code but splint into two both because it is too wide to capture in one and because each half of the code plays different roles.

This first half of the code focuses on drawing a line trace and centring it to the middle of the screen. When the function is fired it will first check using the player character variable made earlier if the mag ammo is greater than 0. If it does then the rest can happen and if not then nothing will happen. When true, an emitter will be spawned and attached to the gun component and its location will be set using the gun muzzle's world location and rotation. Next an in-engine screen shake function called to make the camera shake slightly to mimic recoil using the player camera from the character(I forgot to use the variable and instead used a pure cast which was my bad) as the epicentre of the shake. After that the "Centre Aim Screen" function is called which draws a standard line trace like seen in the interaction stuff above. The difference with this is mainly the range being farther and the "Out Hit Trace End" is feed into the return node to be used further into the code. After this function is called a "Set World Rotation" node is used to to rotate the muzzle by getting the muzzles world location, sending it to the start pin of a "Find Look at Rotation" node, sending the hit location value form the centre aim function to the target pin and sending the return value to the set world rotation node. With the muzzle as the target it will be re-rotated to face the point that the line trace ends which is the centre of the screen. Finally for this half of the code a new line trace is drawn using the muzzles location and rotation so that anything using this hit scan will be centred properly to match the direction the bullet will travel in.

Before continuing, this is the zombie check macro that is used to check if the hit scan hit one of the two zombie classes for spawning blood emitters. It takes inputs and gets their classes. It then feeds into an == node which checks for a specific class which is then feed into an Or bool node which in short means its checking it was is being returned is either a walker zombie or a runner. The result of the bool is then feed into an output node to be used by the main code.

Now that the macro context is covered this is the second half of the fire code. First a check is used to find weather the hit scan has hit a zombie or anything else using the macro mentioned above. If it hits a zombie of either class a blood emitter is spawned an attached to the actor as a component with the "Out Hit Hit Component" result of the hit scan. A string is also printed for debugging to make sure the zombie is actually hit. If the trace hits anything that is not one of the two zombies, it will spawn an impact emitter, using the impact point result as the location to spawn the emitter. Then it will spawn and attach a bullet hole decal to what is hit, again using the impact point result as the location. To rotate the decal properly, a "RotationFromXVector" node is taken from the hit impact normal result in the hit scan and the return value is then fed into the rotation pin in the decal spawn. Once either emitter is spawn they both feed into an actor spawn for the bullet. The bullet is spawned using the muzzle's world location and rotation which are both fed into a "MakeTransform" node which creates a transform value that can be fed into the spawn node. Finally once the bullet is spawn the Mag ammo in the player character is decreased by 1 using the player variable.
Gun Child class

As you can see this is what all weapons will essentially look like. The empty skeletal mesh is now set to the corresponding gun which in this case is the pistol and the muzzle is moved to the end of the barrel.


This is how the event graph looks for the pistol child and it should be noted that the Semi-rifle also looks the same with the only difference being what sound is played. First off there is a branch to check if the gun is firing or not. The gun will not fire until it is done firing which means the player cannot spam the fire button extremely fast. If the gun isn't firing then the "IsFiring" bool is set to true. A sound is played for the gun shooting. Next the Fire function form above is executed. After a delay the "IsFiring" bool is set to false, allowing the player to fire again. This is longer for the Semi-rifle.

The code for firing the Assault rifle works slightly differently. The code is placed inside a function so it can be called by a different node in the event fire gun. First the function calls the Fire function form the parent. It then checks to see if the mag ammo is greater than 0. If it is then a sound is played for the firing event and if it isn't then the reload event is called from the player character(more details on that below).

When event fire is toggled a node called "Set Timer by Function Name" is called. This takes the function mentioned above and executes it in a loop until it is told to stop. There is a time input that creates a gap per shot to stop the gun from firing insanely fast. Connected to the stop fire event is a "Pause Timer by Handle" node. This node stops the above mentioned timer when the stop fire event it called.
Finally the functionality is added to the player character to allow them to fire the gun and reload their gun.

To start when the player presses the "Shoot" button which is left mouse click, a check is used to see if there is ammo in the mag then another check is used to make sure the gun isn't reloading. If the checks pass then the "Fire Gun" Event is called based on the currently active gun. For example if the pistol is active then it will not fire fully automatically but if the assault rifle is active then it will be automatic. Finally if the mag ammo reaches zero when this is called, it feeds into the section of code in the reload event that manages the reloading. If the button is released then the stop fire event is called with the same parent cast used in the fire event. This mostly for the fully automatic weapon.
Below the firing code is the reload event. When the reload button is released (in this case its R), the "Reload Event" is called. That way the player can hold the button till they are ready to reload. As for the reload it starts by comparing the mag ammo to the total mag ammo to see if it is the same. If the mag isn't full then it will return false, allowing the player to reload. It then checks to make sure the gun isn't already reloading. If its not then the "IsReloading" bool is set to true and the reload sound effect is played. After a delay that is set by a reload time variable the "Reload Function" is called and the is reloading bool is set back to false.
Reload Function

To start a variable called "Needed Ammo" is set using the result of the mag ammo being taken away form the max mag ammo. Once this is done it then checks if the total ammo is greater than or equal to the needed ammo. If it is then the mag ammo is filled by setting it equal to itself plus the ammo needed. The total ammo is then decreased by the ammo needed. If the prior check returns false however another check is carried out to see if the total ammo is greater than 0. If it is then what's left of the reserve ammo is added to the mag by plusing the mag ammo by the total ammo and then the total ammo is set to 0. This ensures that the reverse ammo never goes past 0.
Week 6
Weapon Swapping and Locks
The player is intended to collect a few different weapons to make use of the different child classes made last week. To start with the player is given a pistol with a limited amount of ammo to force them to buy more using the ammo crates(more details in week 7). Below shows how the player swaps through their weapons.

To actually swap the weapons there is a custom event which is shown above. This event uses a switch on int to call one of three macros or a print string for during testing to find if the switch ever goes to 0 or not sense that would do nothing. The switch uses the "Weapon Selection Int" variable as its input which can be changed at any time so recalling this event after the change would execute a different macro which if set up right can change the weapon. Below are screenshots of all macros expanded:

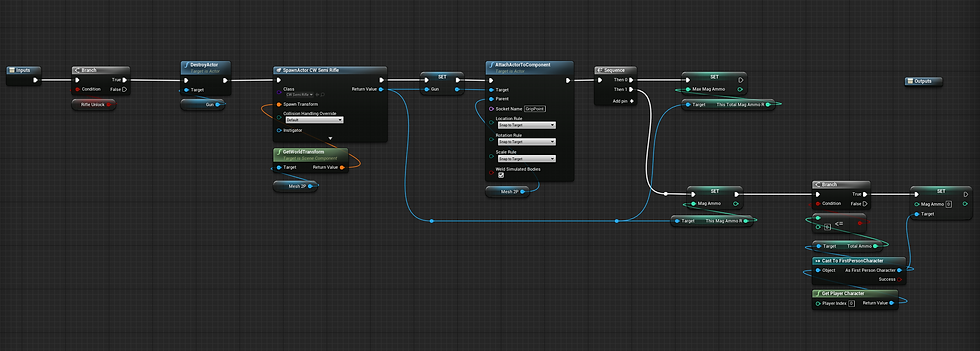

Without going over each one I'll go over one sense they all work the same with the only difference being that the pistol/ gun 1 doesn't have an unlock check sense its already unlocked from the get-go. Using the 3rd weapon as an example, the macro starts with an unlock check to see if the player has bought the gun or not. If they have then the actor variable "Gun" is destroyed which deletes the currently equip gun. A new actor is then spawned which in this case is the assault rifle and its location is set using the player mesh's world transform. Then new actor is then set as gun for future removal and is then attached to the player mesh using the GripPoint socket which places and binds the gun to the player's hand. After that a sequence carries out 2 numerical variable changes. First the Max mag ammo variable is set to the same as the weapon child's max mag ammo variable. After that the mag ammo is set using the child's mag ammo variable then a check is done to see if the total ammo is less than or equal to 0. If it is then the mag ammo is set to 0. This is to stop the player from constantly swapping their weapons to get their ammo back when the have no ammo in the reserves as this would create infinite ammo.
All weapon swap macros work the same as this, taking the child actor being spawned, binding it to the player and using its mag max and mag ammo variables to set the active mag ammo.

To allow the player to actually use the swapping event, two inputs are being used. Next weapon using the Scroll up input and Last weapon using the Scroll Down. Using the next weapon event as the example of process, when it is executed it starts with a check to make sure the Weapon Select Int mentioned above is above 0 and below 3. This check is different in the Last weapon event with it being greater than 1 and less than 4(screenshot is old and value was changed to account for less guns). This check makes sure the value can never get to 0 or above 3. Once the check is carried out an increment (increase by 1) is carried out on the Weapon Selection Int, with the Last weapon instead being a decrement(minus by 1). After the value is changed the Switch weapon event from above is called and depending on the Weapon Selection Int value, a new weapon will be equip. A simple print string is applied for debugging during testing to make sure values behave right. A basic summery of the code is that when the player scrolls up the value will increase up to 3 and if they scroll down it will decrease down to 1, swapping to the appropriate weapon.
Zombie Classes
The player can now move and shoot but now they need something to shoot at, this is where the two zombie classes come into play. Before continuing, the following screenshots are from one of the 2 classes only as both classes are basically identical expect for one bool.


The above screenshots briefly show how animations are set up for these classes. Sense there is some code that involved the animation blueprint it is key to show some context to how it works. In short the above image uses 4 animation clips(an idle clip, a walking clip, a running clip and an attacking clip) each of which are interconnected so that they can transition between standing, moving and attacking. The transitions use bool so if one is changed, the animation will update and change as well.

In the animation blueprint's event graph there is a simple Event that updates the animations being played. It first tries to get the owner of a pawn(which is itself) and checks to see if that pawn is valid. To determine if the pawn is moving, the velocity of the pawn is acquired, the vector length is taken from that and fed into a greater than node. If the vector length is greater than 0 then a true value is returned which is set into a set node for the "IsMoving" node. This basically makes it so that when the AI begins to move the moving bool is set to true which plays the moving animation instead of the idle one. If the pawn stops moving then the vector is 0 which returns false and the bool is set to that too which player the idle animation.

A sound cue is set up with a number of different sounds that the zombies can make. They all feed into a random node that picks one of the 13 sounds to play into a mixer. A looping node then makes the process repeat itself, playing a new sound to feed into the output.

Now that that's out of the way its time to get into the zombie blueprints themselves. For this I'm going to talk about the walker zombie but as mentioned above the runners are the same expect for the movement speed and the movement type bool for animations. The above image shows the code for when play begins. First the animation blueprint is obtained using a cast, with the object reference being obtained through a "Get Anim Instance" node using the zombie mesh as its target sense the animation blueprint is tied to the skeletal mesh. The result of the casting is then promoted to a variable to make it more accessible later on. Next the "IsRunner" bool is set to false sense this is a walker and for the runner this would be true. This makes it so that the movement animation matches the movement type. Next the collision of the right hand(the attacking hand) is turned off to stop the player taking damage when the zombie is not attacking. A 2 second delay is then executed and a sound cue is spawned and attached to the zombie, using the mesh as the component and relative location for the cue's location. This sound cue is then finally promoted to a variable to be access later.

This is a simple overlap event that checks to see if either the player is hit using a cast and if the cast fails it then checks to see if it was a window the hand hit. If it is the player then the "Attack" function is called(more details below) and if it is a window then it will call the "Damage Window" function then set the collision of the hand back to null.

This next overlap event is for when something comes in range for the zombie to attack. A cast for the first person player is fed in to check if it is the player and if it isn't then a hit hit actor is fed into a cast to the window. If it hit the player then it sets the "IsAttacking" bool to true, waits 1.4 seconds then sets it back to false. If it is a window then it checks to see if the number of boards left is greater than 0. If there is then the same process of turning the bool of and on again is carried out. This makes the attack animation play and during this animation a thing called an "Animation Notif" is used to turn the collision off and on at points of the animation but there is hard code included to ensure nothing goes wrong.
Functions

This function is the attack function which is called when the hand overlaps the character. First the first person character is accessed with a cast and the deplete health function is called(details below) with the damage amount being set with a local variable. Next I mistakenly used a second, unnecessary cast to play a world camera shake similar to the weapon shake but using a different shake profile to make it more violent to indicate damage. The character is then launched using the mesh's right vector and feeding it into the X and Y pins of the launch node after having them multiplied by 1200. The right hand collision is then set to null. A check is then carried out to see if the player's health is less than or equal too 0, if it is then the player's death bool is set to true and the "Player Dies" event is called(more info on week 11 ).
Custom Events

As mention above, the bullet blueprint calls a blueprint interface called "Custom Damage Event". This blueprint interface is used as an event to damage the zombie when called. To start it takes the zombie's health and sets it equal to itself minus the damage amount from the interface. It then adds points to the player by casting to them and setting their points equal to the current points plus the Extra Points pin from the damage event. Finally these points are added to the total score using the same cast.

To allow the zombie to ragdoll when it is killed, a simple custom event is used. First the zombie's mesh is set to simulate physics so that all physics constraints on the mesh will drop, making the model look like it does limp. Finally the movement for the character is disabled will will make them stop in place sense they are dead.


The next two images are the first and second half of the custom event that manages the death of the zombie. This event is called in the bullet so that when the zombie is hit so that when its health is 0 it will die. To start a branch checks to see if the health is less than or equal too 0. If it is then the above mentioned ragdoll event is called. After this the player's points are increased by 60 using a cast to the first person character. Next the collision of the of the mesh and capsule component are set to physics only so overlap and hit events can't be triggered. The sound que that was made in the begin play event is set to active with a set active node. A sequence is carried out which can ben seen in both images as there wasn't enough room to capture it all. First a death sound is played then the player's total kills are incremented along with the score being increased by 60 with a pure cast to the first person player. After this the next part of the sequence starts with a print string for debugging that calls that the zombie is dead. After a 2 second delay an emitter spawns of the mesh's world location which emits and explosion. A blood splat sound is then played and the actor is destroyed. The destruction of the actor plays a vital role in the round system(more details at week 8).
AI system
In order to get the zombies to go to the player consistently, an AI system had to be set up using an AI Controller and a behaviour tree to determine the zombie's behaviour during play.

To allow the zombie's to move to the player, the player's location was needed which could be obtained using a task. The custom task above shows this process. When it is executed, a node is used to set the value of a key in what's called a "BlackBoard" which is a collection of variables that can be used in a behaviour tree. The "Player Loc" key is an object reference and the value of this reference is set using the get player character node, making it a reference to the player character. Once this is done, the task execution is told to finish, meaning the behaviour tree can move on.

This next image shows the behaviour tree used for both the walk and runner zombies. The process of thought so to speak is simple enough. With the order going from left to right, the above mentioned task is carried out which the Player Loc variable being set to "SelfActor". A decorator or condition is used to check to make sure that there is a path to the designated object before the next behaviour can be carried out. Once the object reference is set, the AI is then told to move to the object reference/ SelfActor. This is done instead of using an actual location variable as its unnecessary sense the player controller is all thats needed. A tag cooldown is also in place to make a pause between executions.

Finally an AI controller is made for the actors to be possessed by which will allow them to preform the behaviours set by the behaviour tree. In the Event BeginPlay a node is called to run a behaviour tree which in the setting, the above mentioned tree is selected. As for the Target perception, this was added for sensory testing but has gone unused as the behaviour tree does all the work in finding and moving the AI to the player. The only reason it hasn't been removed is in case I come across a reason to use it.
Week 7
Player Healing
By Default, the player has 100 health and zombies deal 50 damage so without healing the player would die in 2 hits. However with the code below the player is able to recover back to full health if they can avoid any further damage for a certain length of time.

hen the event is called it first does a check the following details:
Is the player's health less than the max health?
Is the player's Health Greater than 0?
Is the player's damaged?
If all conditions are true the there is a 5 second delay then it checks if the player is dead. If they aren't then it plays a timeline. The timeline goes from 0-1 in 1 second. The health is set based on a lerp with the A value being the current health, the B value being the Max Health and the alpha being the value of the timeline which creates a smooth transition between A to B. The "Is Damaged" bool is then set to false.
Ammo Box
To allow the player to refill their ammo when it runs out, I made an ammo box which would be placed in a few select areas around the map. It was planned to have one in every major room so the player wouldn't be too stuck to find one but they'd be put in places that would make it difficult to get to with a hoard of zombies around to create a choke point of sorts.

Like the other buyable blueprints, a text trigger is placed in front of the box so that when the player walks up to it, text with the cost and button to press will be displayed. The process of getting the HUD from the player character through a cast and using the Change Key text custom event stays the same along with the Hide text event call.

To actually refill the ammo, a function is called using the above mentioned "General Interaction" Macro. In this function a branch is used to check both if player's points are greater than or equal to the cost and if the total ammo is less than the total ammo default. If the player has enough points and their reserves are not full then the total ammo is set to the default, filling their reserves and their points are decreased by the cost they had to pay. Two sound effects are then played, one being a cash sound and one being a loading sound.
Power Required Door
In the level there will be a door that blocks off a special area that will only be accessible after the power has been turned on.

Just the same as all interactables, there is a text trigger setup with the usual key text change through casting and text hiding. As for the custom event accessed by the power switch, this simply just destroys itself sense the player can't see the door when the power is turned on so there's no need to animate it.
Level Blockout
To end off the week, I deleted all testing areas and began making multiple blueprints for blockout meshes. These blueprints have no code but they play the role of acting as props for the level. Below are a few screenshots of the results of the blockout process.


As an additional note, the wholes in the walls are intended for the windows once they are made and scripted.
Week 8
Spawn Point
To allow the zombies to actually be spawned into the world at set points and to manipulate their spawns so that they spawn close to the player, spawn point blueprints need to be made and given spawn conditions.

The spawn points have a function built into them that can be accessed by the spawn manager which will be in charge of managing the waves as they play out. To start a condition is checked to see what the wave is using the wave identifier. The result of this will change how spawns are carried out in order to create a progression in difficulty. The following list is the intended progression of the spawns:
Waves between 1 and 5 will only have walker zombies spawn
Waves between 6 and 9 will have a mix of walkers and runner with a higher chance of walkers
Any wave past wave 9 will only have runners spawned.
This process of spawning is carried out in the following way. A branch is used to check if the wave is below 6. If that's true then it will only have the walker zombie class spawned using the spawn point's own location. If it's false then a new branch checks if the wave is between 6 and 9. If it is then the spawn identifier is set using a Random integer in range node which just pick a number from a max and min amount each time its called. A branch then checks if the spawn identifier is less than 15. If it is then a walker is spawned on self transform and if its false then a runner is spawned instead. Going back to the wave check, if the last check is false then another new branch checks if the wave identifier is 10 or greater. If it is then it spawns a runner on the self transform. If it returns false then a message is printed to tell testers that something went wrong. Finally on all spawns a print string is used to tell the testers that zombies have spawned.
Wave System/ Spawn Manager
One blueprint is in charge of both the wave system and the spawn management. By this I mean the blueprint managers what wave it is, how many zombies should spawn/ are left to kill and where they need to spawn. This is quite a hefty section so I've broken it down into 3 main sections:
The sub calculations (Functions)
The spawn point additional functionality(Macro)
The wave system itself and the logic behind it
Sub Calculations

To start this is a function that manages the sub calculations for the zombie count and how many need to be spawn per wave sense this number is meant to increase every wave to make things increasingly difficult. The basic equation is to take the current wave number and multiply it by 5 and 2, then feed the two result into a minus node or to use an actual example: (1 x 5) - (1 x 2) = 3. The enemy amount (enemies that need to be spawned) is then set with the result of the calculation. This then tells the game that 3 zombies need to be spawned, thus making 3 enemies that need to be killed for the wave to end.
Spawn Point Additional Functionality
This macro is responsible for the execution of the spawning of the zombies as well as having some additional functionality to be implemented for round changes and just to add things like delays in the spawning.

To start the macro uses a branch to check if the swapping bool is true or false. This bool is only even going to be set to true if a wave change is taking place. If it returns true then there is a 13 second delay to give the round time to change before starting and if it is false them there is just a 3 second delay between spawns. Once the delay is up the Spawn Target function mentioned above is called. The macro is fed an array of spawn points which are used to determine which spawn point the zombies will spawn at. The order of the spawning is then randomized by obtaining the length of the array, decreasing it by one to exclude 0 and that is then fed into the MAX pin of a random int in range node which is then fed into a get array node. This gets a reference from the array using the int as an index indicator. The resulting target/ spawn point is then fed into the spawn target, tell that exact spawn point to spawn a zombie. Sense this process is executed multiple times, the result of the random int node will change and that means the same spawn point may not spawn a zombie.
Wave System

To start, when play begins the Wave Number is incremented, making it start at 1. The custom enemy calculation is then executed to get the number of enemies to spawn, the spawn location number (SLN) is set to 1 to make the spawn zone the starting room (more details about this below) and the zombie health is set to 100(This eventually went unused but was intended for health scaling). A timer by event is then called and is fed a custom event that carries out the wave management.
Before braking down the different areas of management there is a simple check use to see if the enemy amount is greater than 0 and enemies remaining is less than or equal to 49. The first value is to ensure there is still zombies left to spawn and the second value is to make sure the spawn cap has not be met yet. If either are false then false return will fire but if there are still things to and the cap isn't met yet then the true return will fire.

When the value is returned as true, it fires into an int switch which uses the spawn identifier to determine which spawn macro to fire too. This use of the macros is intended to change the specific spawn points zombies will spawn on so that they will always spawn in the same room as the player. The spawn point array for that room is fed into the spawn macro so that the zombies will only spawn on the points in that array and not all spawn points. After any spawn the swapping bool is then set to false though this is only relevant for the first spawn of the round.


If the value returns false either cause the spawn cap has been hit or cause the enemy amount is 0 then the wave management process begins. First all actors of interface that have the interface BPI Enemies are gathered and put into an array. This array is then promoted to a variable and the length is then gathered and sent as a return value to a set node for the enemies remaining. That means the enemies left to kill match the total number of zombies that are present in the level. A branch then checks to see if the enemies remaining is less than or equal to 0. This makes it so that if the spawn cap is hit or if there are no more enemies to spawn then the round won't just change, instead all zombies have to be killed. If the condition is true then the wave number is increased by one. There is a branch there but I have no idea why, the screenshot is meant to show the code as is in the final submission so I have not removed it but it serves no purpose. After the useless check the enemy calculation is then carried out and the new enemy amount will increase. A sequence then begins and splits 3 ways which are broken down below:
The HUD is obtained though a player cast and the "Update Numbered Round" event is called to update the round number and the Highest Wave variable is incremented.
The wave change sound effect is played and the swapping bool is set to true, halting spawns till the sound effect is done. All spawn point actors are then obtained and their Wave identifier variables are incremented using a for each loop node and the result is fed into a print string to show it worked.
Finally a branch checks to see if the swapping variable is true. If it is then a cast is made to the first person character and the "Change Round Animation" event is then called.
This event is repeated in a looping manner by the timer from the event begin play and due to the checks, seamlessly manages when the rounds change, the cap for the zombies that are spawned at one time and the location in which the zombies will spawn relative to the player.

Finally there are multiple triggers that are moved around the map that determine which room the player is in and as such where to spawn the zombies. This stops the zombies from spawning in places the player won't imminently know and also ensure that there is some form of constant pressure being applied. Sense the code is the same I'll use the first one as an example sense it is the first room. If the player walks of and then back into the room the location modifier used in the spawn int switch above is set to 1 using a cast to the player and that result is sent to a print string to show it changed. This being set to 1 means only the spawners in the first array(2 spawners in the first room) will be able to spawn zombies using the Spawn Target function.
Respawn Manager
When the player uses the elevator there is a blueprint in place to take the zombies in the level and force them to respawn, stopping the flow of the wave from being halted as the zombies would have no other way to get to the lower levels of the map.

A custom event is used to be called from a trigger overlap so that when the player changes floor it will be called as they get to the corresponding floor. First a delay begins for 4 seconds and when it is done The enemy amount variable is increased by the enemies remaining. This means that if there are 4 zombies active, 4 zombies will be put back in the list to spawn. After this all actors that have the BPI Enemies blueprint interface which is both classes of zombie are obtained and made into an array. All actors in that array are then destroyed using a for each loop node. This in laymen's terms destroys the already spawned enemies whilst adding the same amount of enemies being destroyed to the spawn list so they will respawn at the new floor.
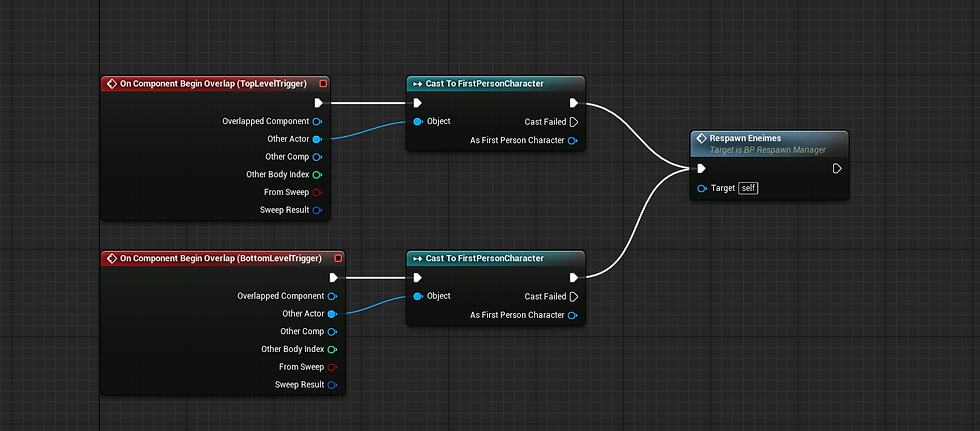
This is call for this event. There are two trigger boxes that are moved to the top and bottom levels of the elevator so that when the player takes the elevator and inevitably enters the triggers the above mentioned event is called

Comments